FB Plugin

Wednesday, March 30, 2011

French Beans


Freezer kit
 Sort of a French-style baked bean that can play as either a vegetarian main course (with vegetable stock) or a side dish.  Nearly fat-free and very low sodium if you use home-cooked beans and homemade stock.  And of course, it can be prepped ahead for same-day or next-day cooking, or made into a freezer kit.  You can choose how much of the cooking will be done on the front end and how much on the back end, depending on your personal schedule.

There are three main parts to this dish, each with some options about how much home cooking to do and when to do it.

  1. Beans:  If you cook beans from dry, go ahead and cook a whole pound (or two) and freeze them in 1-1/2 cup portions.  You'll need 3 cups of cooked beans for this recipe.  Undercook the beans slightly as they'll get a bit mushy in the freezer.  If you really think you'll have more time to cook beans on Dinner Day, you can also freeze beans after they've been soaked (overnight at room temp, or boil for 1 minute and leave in the covered pot for 1 hour), before they've been cooked.  You'll just need to leave yourself an hour and a half to cook them later.  Or you can use 2 cans of beans.  For a meal kit, label the cans and store them in the pantry.
  2. Wine-stock reduction: You'll need 3 cups total of liquid.  At least 1 cup needs to be dry red wine, and 1 cup needs to be vegetable or chicken stock, and the third cup can be whatever ratio of the two you prefer.  If you use store-bought stock from a box, can, cube or granules, only use half the amount called for and make up the difference with water (e.g. for 2 cups stock, use 1 cup boxed/reconstituted stock plus 1 cup water).  Because you're going to reduce the stock and wine, the extra sodium in the store-bought will concentrate to salt-lick levels.  Again, depending on when you think you'll have time, you can go ahead and make the reduction and fridge/freeze it, or fridge/freeze the components of the sauce to reduce on Dinner Day.  Leave yourself 30 minutes for the reduction.
  3. Vegetables: This pretty much needs to be cooked last minute, but the chopping and measuring can be done in advance.  Freeze/fridge the vegetables in one container or bag, and the seasoned beurre manié in another (snack-sized ziptop bags are great for this).
Pin It

Tuesday, March 29, 2011

Bacon Candy

I pretty much only use the oven to cook bacon any more.  If I need just a piece of two, I'll fry it or nuke it, but to do up a pound of bacon, the oven is the easiest way to go.  I put extra bacon (for a family of 3 bacon-consumers, a pound should produce leftovers, ahem) in a ziptop bag in the fridge for sandwiches or snacks later in the week.

Baking also lends itself well to making what I call "bacon candy".  I do not recommend making this a frequent part of your normal breakfast, but every now and then isn't so bad.  Please consume bacon responsibly ;-)
Pin It

Make-ahead Bacon-wrapped Meatloaf Sandwiches

[A moment of reflection for the greatness that is this dish]

No, this is not health food, but this is one of the best things I have EVER eaten.  Ever.  There are no words to convey how serious I am about this fact.  Best. Ever. Period.  And you get versatility in preparation, storage and serving methods.  I don't know that there is anything more perfect anywhere in any category of being.  I cannot claim responsibility for originating this masterpiece, though I have naturally tweaked, simplified and Dinner Done Yesterday-ed it.

There are two main prep-ahead/serving options: 1) mix the meatloaf to store (fridge or freeze), bake later and serve as meatloaf, 2) bake the meatloaf to store to slice and fry later for sandwiches.  And there's the planned leftover option...serve as meatloaf for dinner #1 and slice and fry for sandwiches for dinner #2. If you want to go for complete gastronomic orgasm, fry the meatloaf slices in mojo de ajo.

The meatloaf mix lends itself well to either ground pork or beef, accomodates whatever herbs you have on hand, and did I mention that it's wrapped in bacon and made with bacon fat?  Oh jah, good stuff. 

Pin It

Monday, March 28, 2011

Microwave Pumpernickel Muffins

These are not too bad.  What a ringing endorsement, huh?  Haha!  But did anyone else try those microwave cake kits in approximately 1987?  Blark.  These muffins do not suffer from the same ills I recall from microwave baking 20+ years ago.  Microwaves are famous for not browning food, but these delicious whole grain muffins don't need extra browning.  The microwave leaves the muffins extra tender and of course, it's unbelievably fast, kid-friendly baking without heating up your house.  I also experimented with freezing the uncooked batter and baking single muffins from their frozen state...results are a little ugly, but still tasty.  I think these may enter the lineup of quick ready-made breakfast/snack options.

This is a recipe I dredged up out of a 1980's era cookbook, but unfortunately I don't have the citation.  The only adaptations I've made are to use what I routinely keep in my pantry/freezer and to make the whole process a little less fussy. 

I was a bit short on my 3 oz. of cream cheese when I tested these on account of a certain Little Dude liberating some of the product and giving himself a little moisturizing cream cheese facial in the middle of Meijer, but I think it turned out okay.  I think using a teaspoonful of prepared flavored cream cheese would be on point here, too--the muffins are not so insistently pumpernickel-y that a sweet fruity cream cheese would be out of place, but they are savory enough to support a garlic-and-herb type of filling as well. 
Pin It

Roast Chicken Véronique

Means with grapes.  The grapes freeze well to eat as is (oh jah, frozen grapes are the best!) and to roast with the chicken.  Even if you don't care to eat the roasted grapes as a side dish, they make ah-maz-ing drippings for even more ah-maz-ing gravy.  Sunday dinner at its best.

If you prep this as a freezer kit, give yourself more time for thawing than you think you'll need.  There's nothing worse than trying chisel frozen giblets out of a bird that felt thawed but isn't.  If you freeze the gravy fixings ahead, combine the milk and stock and freeze in a ziptop bag. 
Pin It

Sunday, March 27, 2011

Corned Beef Cheese Ball

And finally, I have a post about the other St. Patty's Day corned beef do-over.  Maybe it's a Midwest thing, but cheeseballs are great pitch-in food.  They can even be frozen ahead and thawed a day before the event. 

If you're going to freeze them for more than a few days, vacusealing is the way to go as the cream cheese is prone to picking up funky odors.  Make the cheeseball, then freeze for at least an hour on a piece of waxed or parchment paper, THEN vacuseal.  Otherwise the vacuum will squish the cheeseball flat.  Once again, I screw up so you don't have to.

I also recommend preparing this cheeseball in a stand mixer rather than a food processor or by hand.  The food processor will just turn the mix-ins to paste and without some electric elbow grease, the cream cheese will stay clumpy and dense instead of mixing into a light, smooth medium for corned beef goodness delivery.

Corned Beef Cheeseball
Makes 2 4" cheeseballs

12 oz. corned beef, coarsely chopped
3/4 cup pickle relish
8 oz. cream cheese
2 cups shredded cheddar
1 1/2 tbsp horseradish
1 1/2 tbsp dijon mustard
1/2 tbsp worcestershire sauce
3 tbsp lemon juice
2 cups walnut or pecan pieces

Combine first 8 ingredients in a stand mixer.  Mix until well-blended.  Divide mixture in half and shape into balls. 


Please to be ignoring the take-out cup in the background
 Spread half of the nut pieces on a piece of waxed or parchment paper.  Roll one ball in the nuts until well-coated on all sides.  Repeat with remaining cheeseball.  Refrigerate or freeze. Pin It

Beurre Manié

Say wha?  Not so much a recipe for a finished product as an aggravation-saving hint.  This something I'm convinced everyone should put in their freezer stash if any stews, sauces or gravies are in their future.  It's not hard to cook a roux-based sauce at all, and truly getting out a tbsp or two of butter and flour to start a sauce isn't all that hard either, but due to counter space restrictions, flour lives in my pantry which is a toddler-free zone which in turn means a Royal Cage Match with the aforementioned toddler every time I want to get it out and put it back.  Not worth it for 1 tbsp of flour, know what I mean?

This is THE thickener of French cuisine (and also of cheese sauce and turkey giblet gravy...very important).  Beurre manié is a combination of flour and butter, and is used to thicken a finished stew, cooked briefly to start a sauce or cooked a long time to form a flavoring agent in Cajun cooking. 

Most recipes call for equal parts butter and flour, which is perfectly fine by me, though I do think you can go as high as a 2 -to-3 ratio of butter to flour and still be fine if you want to cut out a little fat. 
Beurre Manié
Makes 8 portions (each corresponds to 1 tbsp flour called for in a recipe)

1/2 cup butter, softened
1/2 cup all-purpose flour

Combine well using a pastry cutter, food processor or mixer. 

Roll into a log and cut into 8 portions.
 
Freeze on a cookie sheet and put into a zip-top bag.


Lower-fat Beurre Manié
Makes 12 portions (each corresponds to 1 tbsp flour called for in a recipe)

1/2 cup butter, softened
3/4 cup all-purpose flour

Same procedure as above.

How do you use this?  Where a recipe says, "Melt X tbsp of butter and whisk in X tbsp flour", use 1 portion of this mixture for each tbsp of flour called for.  An example:

Cheese Sauce
Makes about 2 1/2 cups

2 tbsp butter
2 tbsp flour

OR

2 portions of frozen beurre manié

1 1/2 cup milk
1 cup shredded cheese
salt and pepper to taste

Melt butter over medium heat and whisk in flour, or stir beurre manié until melted and well-incorporated.  Cook 1 minute.  Whisk in milk slowly to avoid lumps.  Raise heat to medium-high until bubbles start to appear.  Reduce heat to medium and simmer 5-7 minutes, until thickened.  Stir in cheese and season with salt and pepper. Pin It

Thursday, March 24, 2011

Orange and pepper baked fish with Picnic Green Bean Salad

Tonight is the perfect storm of reasons why I can't make dinner at dinnertime.  No outside play time due to inclement weather, early naptime and anticipated late spousal arrival equals too much juvenile energy without adult backup, and that means that not even the Wonder Pets will guarantee me 10 tantrum- and injury-free minutes to put dinner together at Hungry O'Clock.  So everything on the menu tonight was prepared at 8am this morning and will require almost no attention to complete at 6pm.

The fish can be prepped ahead and made into a freezer kit, while the beans are make-ahead but not freezer-friendly.  Whether you're prepping ahead for same-day or next-day cooking or freezing the fish, don't marinate fish until right before cooking.  The acid in the orange juice will turn it into ceviche (not a bad thing, but not what we're going for here) if left too long. 

The beans are best at room temperature, but I doubt I'll remember to get them out of the fridge with enough time to warm up that far.  You basically want to make sure the vinaigrette has a chance to unsolidify as it will harden up when refrigerated.  This is a great dish to make for a picnic or pitch-in because it benefits from a day of melding with no last-minute cooking/assembling and it doesn't need to be kept at dairy-based food safety temperatures. 

My last thought is on preserved lemons.  I adore lemons, and used to make preserved lemons pretty regularly.  If you make/have them, this is a delicious salad to put them in.  Chop up a piece of the rind and discard the flesh. 


Pin It

Wednesday, March 23, 2011

Easy-easier-easiest sides: celery

A lot of people think celery is only good as a transport device for peanut butter or cream cheese.  And there's that business about the act of eating celery burning more calories than you actually get from the celery.  Celery has gotten a bad rap, folks.  It has a good portion of vitamin C and other stuff that may help prevent cancer and high blood pressure (source).  It's cheap even when organic, available year-round and it holds well in the fridge.  It's a great side dish waiting to happen!


Easiest: Crudité

OK, raw is easiest and "Ants on a Log" are cute.  But try dried cranberries for "Fire Ants on a Log" for a change of entomological pace.  Peanut butter is classic, but give hummus or an alternative nut butter a whirl.  Ranch dip is a kid favorite, but some garlic aioli (mayo with minced garlic and a splash of lemon juice) might be nice for the grownups.

EasierBraised Celery (makes as many servings as needed)

2 ribs celery per serving, trimmed and cut into 3" lengths
1/2 tbsp butter per serving
1 tbsp shredded cheddar per serving

Put celery in a pot and cover with water.  Bring to a boil, reduce heat to medium, cover and simmer 15 minutes.  Drain and toss with butter.  Sprinkle with parmesan to serve.

EasyBraised Celery with Olive Tapenade

Follow directions above but serve with 2 tbsp of Muffaletta olive relish per serving instead of cheese. Pin It

Tuesday, March 22, 2011

Easy-easier-easiest sides: Broccoli

I think broccoli has gotten type-cast.  It's quite likely the most stir-fryed vegetable in this country, the most often smothered in cheese sauce, and the most often served steamed without embellishment.  All good methods, but here are three super-easy and super-tasty new ways to do it up. 

Easiest: Blanched Broccoli with dip

Crudité is not just for appetizers!  My kids prefer a lot of vegetables in their raw (or nearly raw) state anyway.  The dip can be as simple as some prepared salad dressing, equal parts mustard and mayonnaise, or a quick oil, vinegar, salt and pepper shake-up.
1 head of broccoli, cut into florets
1 cup dip of your choosing

To blanch broccoli, heat a large pot of water to boiling.  Add broccoli and set a timer for 2 minutes once the water is back up to a boil.  Drain and rinse under very cold water.  Drain well and serve.

Easier: Braised Broccolini

You can get a lot of interest with very little work just by using something a little different.  The novelty of trying a close relative of a familiar vegetable can go a long way in cutting down on the need for increasingly elaborate preparation for the same old stuff. 

1 bunch broccolini (or broccoli rabe)
1 tbsp olive oil
1/4 cup vermouth or white wine

Heat olive oil over medium-high in a skillet.  Add broccolini and saute 2-3 minutes, unless slightly browned.  Add vermouth and cover.  Reduce heat to medium and braise 5-7 minutes, until tender.

Easy: Roasted Broccoli

Roasting takes a little more time than other cooking methods, but the results are jaw-droppingly good.  Really, you have never tasted broccoli like this!  I also like roasting because it's a no-attention cooking method.  You literally stick the food in, set a timer and go do something else.

1 head broccoli, cut into florets (include chopped, peeled stems if you like)
2 tbsp olive oil
1 tsp lemon pepper

Toss broccoli with oil and pepper.  Roast for 20 minutes at 375F.


Pin It

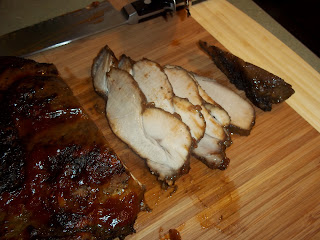
Mocha Ham

I am a big fan of Steven Raichlan's Primal Grill.  I love the nerdy/hip style, I love that he cooks outside and usually has to finish the show in the dark (what vérité), and I love a lot of his recipes.  I am not the Chief Griller at my house, and I'm still trying to convince the CG to try his Moules Éclatées (mussels cooked on a flaming bed of pine needles), but I have adapted several of his recipes for indoor cookery. 

The Java Chicken is A.Ma.Zing, especially if you do it on the grill.  However, today it is threatening rain and I have a vast quantity of pig still left in the freezer, so here is the indoor pork variant of this recipe.  Don't brew any coffee specifically for this recipe, just use the dregs in the coffeepot.  I don't use a mop sauce while grilling because opening and closing the grill makes it hard to keep the coals hot, but in the oven, a mop sauce is worthwhile (it's usually known as "basting" when it's done in the oven).

I've got a fresh ham roast because we get our pork from a local farmer and they'll butcher to order.  It's basically a thick-sliced (1 1/4") piece of uncured pork leg.  Don't use a regular (i.e. cured/smoked) ham if fresh ham isn't available to you.  A pork tenderloin roast is good, as is pork top loin roast and bone-in chicken parts.  This rub/sauce combo is really quite good on just about anything you care to grill/roast. 

You can prep this ahead for next-day/same-day cooking or freeze it.  The spice rub can be made ahead and stored in your spice cabinet in a sealed container or applied to the meat in advance.  I think the longer a dry rub sits on a piece of meat the better, so I would apply it and freeze the roast, if that's the route you're going.  The ingredients for the sauce can be measured, chopped and combined in advance, leaving just the simmering for the last minute or you can go ahead and simmer the sauce and fridge it or freeze it at completion.  If you freeze the simmered sauce, you may still need a few minutes of simmering to thicken it back up before applying to the roast. 
Pin It

St. Patty's Day Redux

Who didn't make corned beef and cabbage for St. Patrick's Day?  Anyone?  OK, well, you over there on I Don't Do Silly Holidays Island and your friend in Corned Beef Is Gross City, you two can stop reading now.

Unless you made it for a party, I bet there were some leftovers.  I'm putting my corned beef leftovers into a cheese ball (!!) and into a Reuben flavored macaroni and cheese casserole.  The hubbie loves reubens, the kids love mac and cheese, I have leftover corned beef and thousand island dressing...winners all round! 

I especially like this type of M&C recipe because you don't have to make a roux-based cheese sauce to bathe the pasta in.  It winds up being less work on the front end and slightly more work on the back end as you have to cook the finished casserole longer on account of the eggs, but I think having less prepwork is an advantage here.
Pin It

Sunday, March 20, 2011

White Seafood Lasagne

This is possibly the most labor-intensive lasagne I make.  You cook the sauce, you cook the protein, you make a special filling...believe me, it's worth it!!  You invest a little more time on the front end (when you *choose* to cook), put less time on the back end (when you *need* to cook), and get a knock-your-socks-off dinner...this is exactly what Dinner Done Yesterday is about.

There are food allergies in our extended cookery household, so shrimp is a no-no.  Feel free to use shrimp, or any other seafood, if you prefer.  In this recipe, I used half whole wheat noodles and half white noodles because that's what I had in the pantry.

White Seafood Lasagne
Makes 1 9x13 pan

Boilables:
1 lb. lasagne
1/2 bunch kale, stems trimmed, or 10 oz. box frozen greens

Scallops:
1 tbsp olive oil
1 medium onion, chopped
1 clove garlic, minced
1 lb. bay scallops

Bechamel:
4 tbsp butter
4 tbsp flour
2 1/2 cup milk
salt and pepper

Filling:
15 oz. ricotta cheese
1 cup Parmesan cheese
1 egg
3 tsp Italian seasoning
pinch nutmeg
salt and pepper

1/4 cup parmesan cheese

Heat a 4 quart pot of water to boiling.  Add kale and boil 10 minutes.  Lift out of the water with tongs and drain.  Chop coarsely when cooled (if using frozen greens, thaw and drain thoroughly, then chop).

Add lasagne noodles to the same pot of boiling water (topping up if necessary) and cook 10 minutes.  Drain and lay flat to cool.  Insure that you have 15 whole noodles.

Heat oil in skillet over medium heat and saute onions and garlic until soft, about 5 minutes.  Add scallops and cook until opaque, about 3 minutes.  Drain any liquid in the pan and reserve.

To make bechamel sauce, in a saucepan, melt butter and stir in flour.  Cook 1 minute.  Slowly stir in milk until completely incorporated.  Increase heat to medium-high until simmering.  Reduce heat to medium and whisk occasionally until sauce is thickened, about 5 minutes.  Set aside.

To make filling, combine ricotta, parmesan, egg, spices, chopped greens, scallop mixture and 6 tbsp of bechamel sauce.

To assemble lasagne...divide filling mixture into 15 portions (about 1/4-1/3 cup each).  Spread each portion on one lasagne noodle.  Roll noodle lengthwise and place seam-side down in lasagne pan. 

Repeat for remaining noodles. 

Pour bechamel sauce over noodles, making sure to cover all surfaces.  Sprinkle remaining 1/4 cup of parmesan cheese over top.  Wrap in foil and plastic wrap and freeze or refrigerate.

When ready to cook, thaw lasagne.  Cook at 400F for 30 minutes, or until heated through. Pin It

Tacos in corn crêpes

Crêpes sound fussy, but really they're not.  They can be made ahead and even frozen with really good results.  I once made 5 dozen crêpes the day before a birthday party, put them in the fridge wrapped in plastic wrap, and served them the next day without any difficulties.  The only trick to doing them in advance is to lay them out in overlapping circles so you can pull them apart later.  If you freeze them, be sure they are fully thawed before trying to peel them apart. 


Crêpe-maker
 I use a crêpe-maker, which I realize is not exactly standard American kitchen equipment (or even standard French equipment, for that matter) but it just dials down the number of swear words I have to use in the course of cooking.  I've cooked with actual French women in actual French kitchens making actual French crêpes, and I just can't get the hang of the pour-tilt-flip skillet method.  So sue me. 

For this taco recipe, why not just use tortillas, you may ask?  These corn crêpes (from my favorite product cookbook EVER, the Argo recipe book) have the flavor of a hard corn taco shell but with the rollability of a soft flour tortilla.  You can serve them rolled with taco meat filling, or folded in triangles with just cheese.  They are worth trying next time you have taco night at your house.  They are a more delicate crêpe than many other recipes (if you've made crêpes before), but a little attention goes a long way. 

Last comment...I make my own taco seasoning to control sodium and heat.  I don't add salt to mine, but feel free to add it to yours if you want.  I also use ancho chile powder for a slightly spicier mixture, but substitute regular chili powder if you prefer.

Corn Crêpes
Makes 12 crêpes

3/4 cup cornstarch
1/2 cup milk
1/2 tsp salt
2 tbsp canola oil
2 tbsp cornmeal
2 eggs

Whisk cornstarch, milk and salt together (this is not easy...be patient).  Whisk in eggs, oil and cornmeal.  Set aside. 


Overlapping circle formation

Heat a crêpe-maker or small skillet.  If  using a skillet, pour 1/4 cup into the skillet and tilt the pan to coat.  If using a crêpe-maker, dip the crêpe-maker quickly into the batter then double-dip quickly.  Cook 1 minute, then flip CAREFULLY.  Cook another 30 seconds, then remove to a sheet of foil.  Whisk batter in between crêpes.

Arrange cooked crêpes in an overlapping circle to help them pull apart later.

Serve with 1 lb. prepared taco filling and any preferred toppings: cheese, onions, sour cream, avocados, tomatoes.

Taco Seasoning
Makes about 1 cup
1/2 cup dried minced onion
3 tbsp chile powder
1 tbsp cumin
2 tsp crushed red pepper
1 1/2 tsp oregano
2 tsp garlic powder
1 tsp onion powder

Combine and store in an 8 oz. glass jar in a dark cabinet.  Use 1-2 tbsp per pound of protein for tacos.


Pin It

Easy-easier-easiest sides: Green Beans

Three quick and easy ways to prepare fresh green beans.  Each requires a minimum of extra ingredients and a step-wise time/prepwork requirement.


Easiest:
Simmered Green Beans
Makes 4 servings

1 lb green beans, stem ends trimmed
1 tsp liquid smoke (optional)

Bring a 3 quart pot of water to a boil.  Add liquid smoke and green beans.  Turn heat down to medium and simmer 20-30 minutes, depending on preferred level of crunchiness/tenderness.


Easier: These have been mistaken at my house for french fries (for realz), especially when they go a couple minutes past the timer.

Roasted Green Beans
Makes 4 servings

1 lb. green beans, trimmed
2 tbsp olive oil
1/2 tsp lemon pepper

Toss green beans with olive oil and lemon pepper.  Spread on a rimmed cookie sheet and roast at 375F for 20 minutes. 

Easy:
Green Beans Provençal
Makes 4-6 servings

1 lb. green beans, trimmed
1 tbsp olive oil
1 onion, chopped
1 clove garlic, minced
1 14-oz. can diced tomatoes, undrained
2 tsp dried herbs or 2 tbsp fresh herbs (tarragon, parsley, herbes de provence, basil)
salt and pepper
Saute onion and garlic in oil for 5 minutes, until soft.  Add green beans, tomatoes with juice, herbs and salt and pepper.  Bring to a boil, reduce heat to medium-high and simmer for 15 to 20 minutes, until green beans are done to your liking. 

Pin It

Chai Spiced Rice Krispie Treats

My husband complains that I do "weird" things to familiar foods and don't warn him, so his mouth expects the usual flavor but is instead hit with something surprising (and delicious, I might add).  His tastebuds don't like surprises apparently.  The cocoa powder here is mostly to warn your tastebuds via your eyeballs that these are not run-of-the-mill Rice Krispie Treats.
Pin It

Friday, March 18, 2011

Waste Not: Bacon

  
Gratuitious bacon shot
More specifically, bacon grease.  My mom kept a coffee can by the stove to collect bacon grease so that it didn't clog up the disposal.  She threw it out when it got full.  I don't know for sure that my grandmothers or great-grandmothers kept a can by the stove the collect bacon grease, but if they many housewives of their generation did and it was to use for cooking.  Most cookbooks written before the 1960's don't specify what kind of fat to use in a recipe...because the cook might have been using rendered bacon fat just as often as oil or butter.

But it's so high in fat!!  So are butter and olive oil, actually.  It's all fat, and you shouldn't go bonkers with any of it really.  Bacon grease is immensely flavorful (like butter) with a high smoke point (like canola oil).  You don't have to drown all your cookery in bacon fat, but a tablespoon added to other fats will help correct their deficiencies.  Just don't add any extra salt to the recipe.
Pin It

My Science Fair Project: Part 2

...in which is revealed the Experimental Design (at last, SLIS L509 proves useful!)

To re-cap (Get it?  Cap, like mushroom caps?  Hello?  Hello???), there are several suggested methods of cleaning mushrooms: dry brushing, peeling, wiping with a damp cloth, rinsing + patting dry, rinsing + spinning dry, quick soak + patting dry, quick soak + spinning dry.  For the sake of thoroughness, I will include longer soaking even though it is uniformly not recommended.  The disasters that supposedly await improperly cleaned mushrooms include failure to remove all dirt (cleanliness), sogginess (textural issues) and loss of flavor.  And as there are already a few well-documented demonstrations debunking mushroom-washing myths for immediate cooking (which all recommend quick rinse + pat dry), I will concentrate exclusively on the effects of cleaning method on prep-ahead cooking. 

Procedure
For each cleaning method, two whole button mushrooms will be cleaned, sliced, stored for 24 hours, cooked and taste-tested and quantitatively evaluated by a small but discerning panel (me and my husband).  The taste-testing will be conducted so that the tasters (at least my husband) will not know which cleaning method was used on which experimental group.  For this experiment, I define "rinsing" as being placed under cold running water and "soaking" as being placed in a bowl containing water.  A "quick rinse" will last 2 seconds, and a "quick soak" will last 2 seconds.  A "regular soak" will last 2 minutes.
  1. Two whole mushrooms will undergo a single cleaning method (no cleaning for control, brushing with a silicone brush, peeling with a paring knife, wiping with a damp paper towel, 2 second rinse + pat dry with a paper towel, 2 second rinse + spin dry in a salad spinner, 2 second soak + pat dry with a paper towel, 2 second soak + spin dry in a salad spinner, 2 minute soak + pat dry with a paper towel, 2 minute soak + spin dry in a salad spinner).   
  2. The mushrooms will be sliced after drying (if part of the cleaning method) using a mushroom slicer to insure even thickness of slices. 
  3. The mushrooms will be stored in open zip-top bags numbered 1-10 with a paper towel to strike a balance between possible condensation and possible drying out.  The mushrooms will be refrigerated to insure food safety.  A list will be made linking the experiment group numbers to the cleaning method, but will not be viewed until data analysis begins.
  4. The mushrooms will be sauteed over medium heat ('5' on my stove) for 5 minutes in olive oil. 
  5. The mushrooms will be tasted and evaluated after a 5 minute cooling period. 
  6. The results will be quantified using a 5-point Likert scale.  Each judge will award a score to each numbered sample for cleanliness of the mushroom, texture and flavor. 
  7. The result metrics will be added to give an overall score to each cleaning method.  Averages will be computed for each result category as well as for the overall performance score to determine the best cleaning method. 
  8. Qualitative preparation notes will be kept and discussed, but will not figure in the analysis of the data and determination of the preferred cleaning method.

Control Group/Variables/Constants
  • The control group will consist of two uncleaned mushrooms subjected to the above procedure. 
  • The independent variable is the cleaning method.  There will be 9 experimental groups in addition to the control group. 
  • The dependent variable is how the mushrooms look and taste after cooking. 
  • The constants are:
    • Type of mushroom (white button)
    • Method of preparation (slicing with mushroom slicer)
    • Method of storage (open zip-top bag with a paper towel in the refrigerator)
    • Method of cooking (sauteing in olive oil)
    • Serving time (5 minutes after cooking)
Data collection form to be used:

Group #CleanlinessTextureFlavorOverall
1
2
3
4
5
6
7
8
9
10
Scale:
12345
Strongly DislikeSomewhat Dislike NeutralSomewhat likeStrongly like


Oy...this is just as tedious as I remembered.  Next installment will have...duh-duhduh-daahh!...Results and Analysis, and maybe even Discussion and a Conclusion (whenever I get the chance to actually do this LOL) Pin It

Wednesday, March 16, 2011

Snap peas and water chestnuts

A little out of the ordinary for a stirfry.  You could skip the sugar altogether if you wanted, and maybe use a tsp of cornstarch to thicken the sauce a bit.  The gin is totally optional here, but it does lend a crisp note that plays against the richness of the soy and sesame flavors.

One of the things I like to keep in my freezer is pre-grated ginger.  When you buy some for a recipe, usually you only need a tablespoon or two and not a whole hand's worth.  If you go ahead and grate up the whole hand (a food processor is great here) and put the grated ginger in a zip-top bag in the freezer, you can pull out a small chunk as needed. 
Pin It

Cubans

Sandwiches, not cigars.  They're a great way to use up leftover pork roast, which is one leftover that tends to hang around drying out in our fridge.  It's much easier to get thin sandwiches slices if you slice the roast after it's chilled. 

You can put the sandwiches together ahead of time, as long as you put the pickles in between layers of meat and cheese rather than against the bread.  Then you can grill them when you're ready.  We use the George Foreman for this purpose, but a griddle and a brick (or an actual panini press) will get the job done, too.
Pin It

Tuesday, March 15, 2011

Roasted spring vegetable salad

I am a huge fan of warm or room temperature salads.  This is adapted from an aggravating recipe that I clipped out of the Washington Post a million years ago.  My adaptation involves many fewer steps and only uses vegetables that actually grow in the same season (the original included zucchini and asparagus...yeah, yeah, you CAN buy asparagus nearly year-round...doesn't mean you SHOULD). 

It really is helpful to the cook the beets separately so that they don't color the other vegetables, unless you like completely purple food.  That's today's edition of "I Screw Up So You Don't Have To".

Roasted vegetable salad
Makes 3-4 servings

Dressing:
1/4 cup olive oil
1/4 cup red wine vinegar
1/2 tsp lemon pepper

Shake oil, vinegar and lemon pepper together.  Set aside.

Salad:
2 tbsp olive oil, divided
2 tbsp butter, divided
1 medium onion, sliced
2 medium carrots, sliced
1 lb. asparagus, tough ends trimmed and cut into 2" pieces
1 bunch beets, peeled and cut into 1/2" pieces
1 tsp lemon pepper, divided
1/2 tsp dillweed

4 cups shredded romaine lettuce
1/4 cup parmesan cheese or goat cheese

Heat 1 tbsp olive oil and 1 tbsp butter over medium-high heat.  Saute onions and carrots for 3 minutes, stirring frequently.  Add asparagus, 1/2 tsp lemon pepper and dill, and saute another 5 minutes, until vegetables are browned and soft.  Put vegetables into a bowl.

Heat 1 tbsp oil and 1 tbsp butter in the same skillet and lower heat to medium.  Add beets to the pan and season with 1/2 tsp lemon pepper.  Saute beets for 8 minutes, until soft.  Add beets to other vegetables. 

To serve, dress the lettuce with the vinaigrette, reserving some for serving at the table.  Put the vegetables in the dressed lettuce and sprinkle with cheese.  Pass extra dressing on the side. Pin It

Sunday, March 13, 2011

Beer marinated olives


Savory, dried and bundled
A twist on olives marinated in oil and red wine.  Great make-ahead party apps.
 
I use savory in this recipe, which is an herb not often found at the local supermarket but with a flavor similar to rosemary in my oh-pinion.  I've put this herb in my herb garden rotation instead of rosemary for its small leaves (no chopping necessary, unlike rosemary), its propensity for reseeding itself and its capacity for dried storage.  At the end of summer, I tie several stems into a bundle with kitchen twine and store in the pantry in an open plastic bag.  When you need to use some, you just shake the bundle over a cutting board until you have the desired amount.  Easy-peasy!  If you don't have savory, sub in rosemary.


Pin It

Thursday, March 10, 2011

Store-bought vs. homemade: Thousand Island Dressing

Don't get me wrong!  I am all about store-bought for some things...pie crusts, peanut butter, roasted red peppers.  But I simply do not understand what has happened to the manufactured version of many things to make them taste the way they do...teriyaki sauce (more on which later), mayonnaise, salad dressings.  When you make these things at home, they taste NOTHING like their store-bought counterparts.  Not always better (SEE peanut butter), but totally dissimilar and in many cases in my oh-pinion, the homemade version is in fact superior in taste.  And cheaper.  And healthier.  And cheaper. 

So Thousand Island Dressing.  I made some as an enticing dip for crudité.  It takes nothing like store-bought, which is a giant plus as far as I'm concerned.  My better half who likes store-bought TID also liked this, so don't give up on it if you do happen to enjoy the Miracle of Modern Chemistry that is shelf-stable salad dressing.  I like the tofu base here as a way to sneak in extra protein and reduce fat content.  This recipe uses the type of tofu that comes in a box, like this:

I know it seems asinine to use just a couple tablespoons of minced vegetables.  Here's what I did...I'm planning to make cheesesteaks later in the week, so I went ahead and sliced some onions and green peppers for that, stole a slice or two of each for this recipe, and put the rest in a container to saute later.  I get double-mileage out of my prepwork!

Homemade Thousand Island Dressing
Makes 1 1/2 cups


Finely chopped veg

3 tbsp minced fresh onion
3 tbsp minced bell pepper
3 tbsp minced green olives
1 hard boiled egg, finely chopped
1 10 oz. aseptic package firm tofu
1/4 cup ketchup
1 tsp BBQ seasoning (I'm using Penzey's)
1 tsp worcestershire sauce
1/2 tsp salt
2 tsp lemon juice

Put onion, green peppers, olives and egg in a food processor and pulse until very finely chopped.  You don't want big chunks of anything left.

Add the tofu, and pulse until tofu is smooth.  Add remaining ingredients and pulse to combine.
Pin It

Green smoothie

I have been scheming ways to get more vegetables onto our snacking menu, and I now give you Green  (honeydew-spinach) Smoothies.  No, it does not taste like spinach.  I promise.  It tastes like sweet honeydew lightly accented with cardamom. 

I recommend scoping out your produce section to see if they have a "clearance" area.  I rescued a container of pre-chunked honeydew that was on its last good day (and was thusly discounted); this is the BEST fruit for this type of recipe because it is super-duper ripe, soft and sweet.  And on sale, ka-ching!  And you're saving perfectly good produce from being thrown away.  Fruit rescue perhaps isn't as emotionally fulfilling as animal rescue, say, but it does put me in a dancing mood.

You want to get the spinach pureed as smoothly as possible so the texture doesn't rat you out.  I did pretty well with pureeing the spinach with the honeydew, but next time I'd zap the spinach in the microwave for a few seconds to make sure it's really soft and whiz it in the food processor by itself first to get it even smoother.  My instructions reflect that planned change of procedure.  As with the other smoothie recipe detailed on this blog, you'll need 2 or 3 ice cube trays to freeze the mixture.

Honeydew-Spinach Smoothies
Makes 7 toddler-size smoothies or about 3 adult-size smoothies

1 10-oz. box frozen spinach, thawed and squeezed dry
1 cup apple juice
1 lb. cubed very ripe honeydew (about 4 cups)
1/4 cup sugar
3/4 tsp cardamom
1 cup vanilla yogurt

Put thawed, squeezed spinach in a microwave-safe container and zap for about 10 seconds.  Squeeze again.  Put spinach in a food processor and add a tbsp or so of apple juice.  Puree until very smooth.  Add honeydew and puree again until smooth.  Add cardmom, sugar and yogurt and puree again.  Pour mixture into a container with a pouring spout and stir in the remaining apple juice.  Pour into ice cube trays and freeze.


Kitchen Assistant (optional)
 To make a smoothie: Put 3-4 cubes in a blender with 1/2 cup water (for a toddler portion), or 6-8 cubes with 1 cup water (for an adult portion).  Blend and serve. Pin It